Testimonials
Chris Flooring , The Finest Case Study – Koppers No Nail Decking
Customer Type: DIY
Decking Material: Merbau by Deck-Max
Color: NA
Biscuit Type: Deck-Max “Original Biscuit
Screw Type: Class 3 wood screw – Painted black head.
Accessories Used: Deck clamps, CounterBore tool, Wood plug kits.
Job Size: 44 square metres
Location: Brisbane. Qld.
Message from customer
Hi all,
Ive just recently finished building my first deck and wanted to share the results. I’m not a tradie and this would be my first major building project. I had a lot to learn but thanks to this site and the many who contribute the project was a success. In the beginning I did a lot of reading, a lot of planning and took a lot from this site. Its great that people can ask their problems in the forum and get answers from those that have solved that same problem as well and even get some insight from the experts.
There were a lot of things that I hadn’t considered, right ways and wrong ways to do things. Once you know what you’re doing, as with anything, its easy. When you’re starting out, it can be daunting.
So this is my first house and I have a spot already for a deck. It’s an L shape, undercover so really there is just the deck. Because its a new house it has been fitted with termite protection that comes with a warranty. There are rules that come with the warranty and one of them is about decking to the house. You can bolt your deck to the house, but the deck must be about one brick depth below the doorway. I can go into more detail if anyone is interested – just contact me. This would mean there is a step down as you walk out onto the deck. My deck is ground level – I have about 300mm to work worth and I wasn’t too keen on the step idea. That would give me about 200mm to work with which is getting a bit close to the soil.
The other way you can do it is to leave a 20mm gap between the house and the deck. This leaves enough for the termite people to do their inspections and keeps the warranty valid. In this case the deck is the same level as the floor in the house, so there is no step. My builder used this method in the display homes and I was happy with that.
I was keen on doing it once and doing it right. That’s just something that I always try to do. As some of the other guys on the site were saying, I would rather over-engineer than under-engineer. I would hate to spend all that money and time only to see even part of the deck start falling apart in a year or two – might as well put in the extra effort to be sure, even if that meant a little more time or money now. The other thing I don’t want is any movement or creaking as you walk on the deck. It has to be solid. That being said, I realise that there is a lot of work that I have done that wasn’t necessary. It was just myself doing it on the weekends that I had free so this ended up taking about 8 months in between other smaller projects.
So to start, photos are great and I’ve tried to take as many as I can throughout the process. You could almost look at the pictures on their own and build a deck without reading a single word. Because I was doing bits here and there on the weekends I had plenty of time to take photos at each stage. I will include the best photos but if you want more just ask.
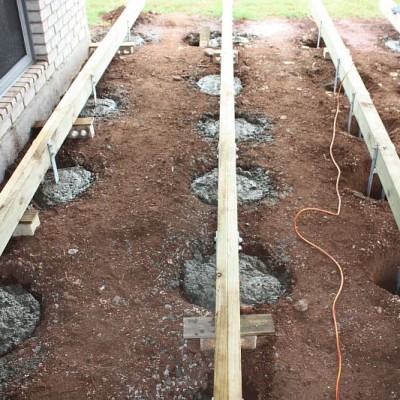
After thinking about it for a long time I finally started by roughly levelling the area. I liked Raff’s idea (in the post above) of digging a hole at every metre. So you imagine a grid 1mx1m, there is a hole in each corner of that 1m grid. I started digging by hand but quickly realised that this wouldn’t work. The ground is a solid dry clay and I was going nowhere fast. I would either have to reduce the number of holes that I was digging or find an easier way. (Supervisor checking the depth)
Once that was done I had to get metal stirrups and bearers. I liked the way others did a floating stirrup, where the stirrup was attached to the bearer and was dangling in the hole, everything lined up and then concrete poured. Talking to people about the deck, most hadn’t heard of this, but it made life so much easier. I put a metal stirrup in each hole then sat the timber near the stirrup. Im using 2x 140x45mm treated pine bolted to each other for bearers. I then pulled each stirrup onto the timber. The good thing about using two bearers was that they would pull together, so if one was warped or twisted, it would be pulled together to make it straighter. The stirrups are 90mm wide so two 45mm bearers squeeze in just nicely. If the bearers were a little wide in one spot, say 92mm whereas the stirrup was only 90mm, I used a clamp to pull them on. It was really easy. The small ridges on the treated pine mean that when they are in the stirrup, they will lock together. If one was sitting higher than the other, I would just hit it with a hammer or clamp and it would move and lock because of the grooves.
I did consider hardwood, as one seller convinced me that they I could get the solid deck with them where I couldn’t with pine. He told me after building a pine frame for a deck, he would never do it again because it just wasn’t solid. Fortunately for me, he was a bit lazy and took forever getting back to me with prices etc and so I went with pine. The deck is rock solid, the pine is easier to work with and I saved some $ too. I’m totally happy with the treated pine frame.
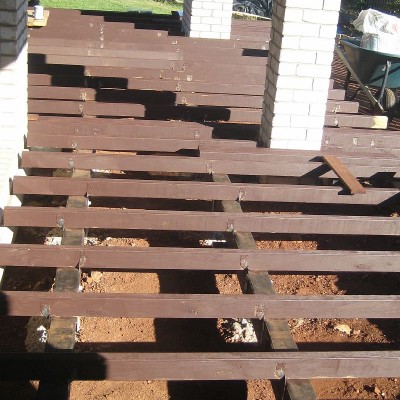
This took a little while to complete and by this stage I noticed that there was mould forming on the joists and bearers. I decided to protect the timber while I still had access to the frame by painting it with some brown paint. You want to go brown or black or similar because you will see bits of the joist between the decking and you don’t want it to stand out. And so the whole frame was given a coat. I used an exterior paint. This wont see much weather but you will find some paints have a lifetime guarantee with a few conditions, so they are tough. This will again extend the life of the frame.
Next is the fun stuff. Decking timber and fasteners. Now this took me a while to decide what I was going to do. Timber choice was easy. Standard Merbau 90×19. Merbau is a stable timber and is resistant to warping etc. Fasteners had me really researching.
Ive heard too many bad things about nails lifting and needing to be re-punched. Ive also seen decks with nice dome top nails look great, only to have the nails bashed below the surface when the deck needed sanding. Next was the now very common, 10g x 50mm stainless steel square head screws. There are drill bits which pre-drill and countersink a hole for you, screw the screw in and you’re done. They are relatively cheap, easy to install, wont rust, shouldn’t lift out of the hole, have a very strong hold strength and you can easily remove a board in the future if it was damaged or for whatever other reason.
But there were also the no nail options. Heaps out there if you look around. Just about every timber yard had a different type. They all had a similar idea of holding the decking board on the side of the timber between the boards, rather than through the top. There are pictures of completed decks around and they look great. Just the natural beauty of the timber with nothing to distract your eye. If I was to choose one though, it would have to last. If I had to screw it down with stainless screws in two or three years because they weren’t holding it would be a waste of time and money.
? But which one to choose? Why so many different types? They are all interesting and work in slightly different ways to achieve the same result. Which would last? Which was a pain to install?
It really did take me some time to sort through. Some use a metal claw that is punched into the side of the wood, some use plastic biscuits that sit into grooves. Some don’t allow you to picture frame your deck, which I planned on doing. Some of the suppliers were terrible. I called some timber yards, who really had no idea about the product they are trying to sell and didn’t have prices available. When they got a price they really didn’t include all the different bits that I would need and to chase it up would be really painful. I searched and searched and found these guys:
Timber Decking, Decking Materials, Timber Flooring – deck-max.com.au
Now I might rave about them a bit and some might think that I have invested interests in this company but the truth is I don’t (yet – I wish I could). These guys answered the questions that the other companies wouldn’t. They had really thought of it all. What do you do with mitre joints when picture framing? And securing your starting board? They had the answer. They have everything available, prices on their website and you can order directly from them. Plus their products are Australian made.
Now all of the no nail decking options have these disadvantages –
Price – they are more expensive to purchase than nails or screws. This may be offset by less work in the long term. I haven’t don’t the math yet but these are more expensive than the stainless screws.
Back to deck-max. Deck-max uses a very strong biscuit to hold the board in place. Have a look on their website to see what I mean. Its made of a strong plastic type material. Forgive me I am not a materials expert. They have plugs to use in your first and last board. As I mentioned previously each board helps hold the next board, but the first and last board on the deck doesn’t have a board next to it. Deck-max is the only company that really had a nice solution – plugs. They also had special decking clamps (get one, they are great) as well as screws and the countersink bits if you choose to go down that path. They really stood out and once I found them, my decision was clear.
Now there is one problem. The Australian standards, if I remember reading correctly, say that cutting out the side of the board isn’t recommended as water can sit in this groove and cause rot. Deck-max have a solution for this called a pro-biscuit. Basically they sell you the timber and the biscuit, with a special groove cut in the timber that allows the water to drain easily. Its cut at an angle so that gravity takes the water away. You must buy the timber from them though as the cut cannot be done on a regular biscuit cutter.
Their other option, the original biscuit is slightly different. It uses a standard horizontal cut into the side of the board. You can buy the timber pre-grooved from them or a timber company. I didn’t like the idea of long cut up the side of the board, so the other option is to cut the groove in the timber yourself using a biscuit cutter. This way the cut in the timber is only where it is needed. This means less water to sit in the grooves and I was worried that you might see the cut in the side of the timber at different angles sitting on the deck. Their postage was really quick and their staff were helpful. I wont go on about them anymore, but if you want more information check out their website.
Because I was cutting the groove into the board myself, I could order from a local timber yard. This saved me transport costs and you also pay extra for the pre-grooved boards. You spend time cutting the boards if you do it yourself so the choice is there. Save time or save money. But time is money so are you really saving? That answer is too deep to be answered here.
Anyway Ive ordered the timber and ordered the fasteners. The timber will start to warp if its left sitting so the sooner you can get it down the better. Some pieces will be worse than others. The great thing about the deck-max is that I found it easy to straighten every board and lock it in place, so there was no waste, even though it took me a few weekends to get it all down.
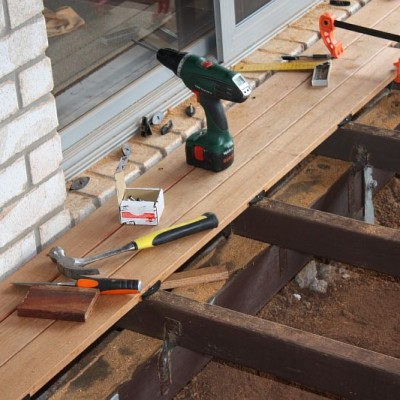
First board going down. Take time to get this PERFECT. How straight the end board goes down depends on this first board. It took me a couple hours of playing with this one board until it was down. I left a 20mm gap around the end for the termite protection. You will notice the holes cut for the plugs.
Now the deck-max biscuits that sit between each board also give a perfect spacing between the boards of 3mm. This is ok for 90mm merbau but wider decking boards will require more space to allow for more expansion and movement. If you want a gap bigger than this (up to 6mm) you will need to space them separately. If you are happy with the standard 3mm the process speeds up but you need to have that first board right. If you are leaving a bigger space you can change the width of the gap slightly to correct.
I was cutting my own slots in the side of the board for the biscuits but this isn’t too difficult with a biscuit cutter locked at the correct settings. The biscuit cutter cost me about $100 from Bunnings and cut thousands of slots without a problem. Because I was picture framing the deck the second board I laid was the one at a 90 degree angle to the first. There is a spacer between each board my picture frame board to give a perfect 3mm gap. Once this board is down its staying down and so grooves need to be cut before its laid. You might be able to cut when board is down but its much easier to do when its free and if you make a mistake you can just throw that board away and start again.
Once the first board is down you can get in a routine and really start moving. I took time to check each board for defects in the timber such as chips etc. I would then measure and cut the board to the desired length on a drop saw with a slight 3 or 4 degree undercut. That is to cut at a slight angle. I learnt that from this site and it is a brilliant idea that you just don’t think of when you come along to build something for the first time. Look around as another member did a good job at explaining it but basically it means that the timber will always butt up at the top of the board so there is no visible gap between the two bits of timber when they join. I would turn the board upside down, mark with a white timber crayon where the biscuit cuts were over the joist then use the biscuit cutter to make the slots. Because I was marking the bottom of the board I didn’t have to worry about removing the marks later. I would turn the board back over and tap it in to place.
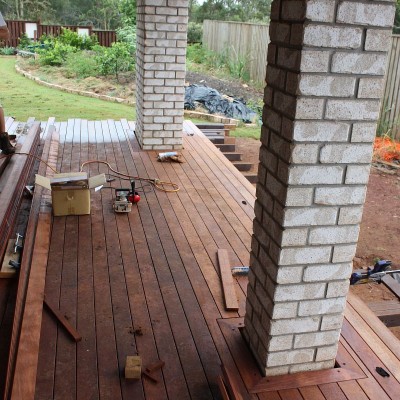
The instructions are provided with the deck-max packaging, so I won’t go into too much detail, but I got an old scrap bit of timber and a hammer and walked along belting the board into place. I layed just about the entire 44m2 of decking by myself this way, taking on twisted, warped boards with just my clamps and a hammer. If a board was badly warped I would use a ratchet strap, like you use on a trailer or truck, and wrap it around the board, secure it to somewhere solid and use the ratchet to pull it in place. I could continue to lay boards which further held it in place and overnight the glue would dry and the board would be well and truly locked straight. Straight boards and lightly bowed boards went down very easily though. And finally the deck-max clamp.
I knew the timber would come up better after a sand but I didn’t realise how much. Wow. I was a bit reluctant, having done so much of the deck myself, to let someone else work on it. I was’t sure if the price was really worth it for a sand but as soon as I saw the result after the first run with the floor sander I was happy. It came up beautifully. The guy did a sand with a floor sander which took off enough of the top layer of timber to fill two big black plastic bags. He then did a fine sand then a buff.